I can't believe that the end of the school year is here. It makes me sad knowing today was the last day my boy will be in preschool. He is growing up too too fast! He had the best teachers ever and he wanted to make them each some thank-you gifts. These are a perfect end-of-the year teacher gift (or would be great for Mother's Day as well).
Being the outdoor kinda kid that my boy is, he wanted to give them plants. He decided to grow them some assorted herbs. And during a trip to the nursery, my girly girl decided to buy flowers for hers.
To make it a more personal gift, we decided to make the "pots" to put them in. As you know if you read my blog, I like projects that:
1. Use items I already have (especially ones from my recycling bin)
2. Are easy enough that my young children can do them by themselves
3. Are quick enough to hold the attention span of a 2 year old
This met all my requirements.
So for the pots, we dug out some soup cans and painted them. I decided to spray paint them white to make the colors show better and to prime the metal. My son decorated with paint and my daughter with permanent markers.
I think they turned out cute, and I'm sure the teachers will appreciate the thought that the kids put into the gifts.
Showing posts with label home-made present. Show all posts
Wednesday, May 23, 2012
Sunday, October 30, 2011
Fun Fall Pictures
This is a great decoration for fall and simple for all ages (after seeing the kids' pictures framed, I want to do one myself now).
I started with a piece of scrapbook paper. I used paper that was textured so that it would look a little nicer than plain paper (but any paper will work). Next, I took brown paint, mixed in some metallic brown for fun, and painted a tree on the paper. Then once dry, I gave each kid a painted tree and some buttons and had them glue the buttons on using clear-drying glue and a paint brush. They had glue all over the buttons and paper, so its important to use a clear-drying glue, like Elmer's. Since we were doing fall pictures, I grabbed bags of buttons that were assorted fall colors. But, you could also do a nice spring picture by using assorted green buttons and maybe even a red here and there for an apple or a pink for blooms.
Simple. Beautiful.
I started with a piece of scrapbook paper. I used paper that was textured so that it would look a little nicer than plain paper (but any paper will work). Next, I took brown paint, mixed in some metallic brown for fun, and painted a tree on the paper. Then once dry, I gave each kid a painted tree and some buttons and had them glue the buttons on using clear-drying glue and a paint brush. They had glue all over the buttons and paper, so its important to use a clear-drying glue, like Elmer's. Since we were doing fall pictures, I grabbed bags of buttons that were assorted fall colors. But, you could also do a nice spring picture by using assorted green buttons and maybe even a red here and there for an apple or a pink for blooms.Simple. Beautiful.
Labels:
activity,
decorations,
fall,
home-made present,
painting
Wednesday, August 31, 2011
"Tie-Dye" Done Simple (Yes, We are tie dying AGAIN)
Of all the ways we have tie-dyed, this has to be the easiest for kids! Its soo simple and much cheaper than buying actual tie-dye.
Basically, take some permanent markers, draw on a shirt, spray some rubbing alcohol all over it, and wait for it to "tie-dye". Boom-taw your done (well, other than setting your dye - details at bottom of post)! I took before and after pictures to show how different sized lines made different designs.

Before and After

Before and After
If you want the marker on both sides of the shirt, just lay the shirt flat on the table (on paper so it doesn't bleed on the table) and start drawing. Then turn the shirt over, and go over the lines to make them darker. Spray both sides with alcohol either using a tiny spray bottle or a pipette.
If you want to keep the design in just one spot on the shirt, you can stretch the shirt over the open side of a bowl and put a rubber band around it to keep it in place. Then spray with alcohol and let dry before removing from bowl.
I also thought it would be cool to tie-dye a shirt the traditional way first in a couple of light color,s and then after it has set, do the marker method over top of it. Can't wait to try this next time!
To set your design:
After spraying your shirt, let it set for about 6 hours (even though it will dry fairly quickly). Fill a bucket half with vinegar and half with cold water. Let your shirt sit in the mixture for 30 minutes, then wash on cold.
Basically, take some permanent markers, draw on a shirt, spray some rubbing alcohol all over it, and wait for it to "tie-dye". Boom-taw your done (well, other than setting your dye - details at bottom of post)! I took before and after pictures to show how different sized lines made different designs.

Before and After

Before and After
If you want the marker on both sides of the shirt, just lay the shirt flat on the table (on paper so it doesn't bleed on the table) and start drawing. Then turn the shirt over, and go over the lines to make them darker. Spray both sides with alcohol either using a tiny spray bottle or a pipette.
If you want to keep the design in just one spot on the shirt, you can stretch the shirt over the open side of a bowl and put a rubber band around it to keep it in place. Then spray with alcohol and let dry before removing from bowl.
I also thought it would be cool to tie-dye a shirt the traditional way first in a couple of light color,s and then after it has set, do the marker method over top of it. Can't wait to try this next time!
To set your design:
After spraying your shirt, let it set for about 6 hours (even though it will dry fairly quickly). Fill a bucket half with vinegar and half with cold water. Let your shirt sit in the mixture for 30 minutes, then wash on cold.
Labels:
activity,
clothing,
home-made present,
Tie-Dye
Tuesday, August 16, 2011
Sew Fun
Want to know whats great about teaching your kids needlework?
1. Its fun and entertaining.
2. Little ones can make artwork that any family member would love to have.
3. Needlework is good practice for hand-eye coordination which is great for little ones learning to write.
Materials (Other than the buttons, these materials will all be located in the needle art/cross stitching section of your local fabric store)
Stitchable fabric - These fabrics are pre-cut in small sizes for needle art. Make sure you choose a fabric that is larger enough to fill your hoop. I chose a bread cover material because the holes were a little larger which would make it a little easier to stitch through.
Embroidery Hoop - There are lots of sizes and colors. I got cheap plastic ones (ranging from $2 to $5).
Embroidery Floss - Any color
Yarn Needle - These are metal (or plastic) needles that have NO point. Just make sure you don't get one with a big head as it won't fit through your buttons.
Bunch of Buttons - Rather than use buttons from my stash, I bought a bag of assorted shapes so that my son would enjoy them a little more, plus the shape buttons had bigger holes than normal buttons.
Time to Sew
Take the fabric, and put it into the embroidery hoop. Now, thread the needle with a piece of embroidery floss. I kept the floss pieces to about 2 foot so that my son could easily work with it. Instead of leaving a piece of thread hanging from the eye (as you would normally do when handsewing), I tied a knot so that it didn't slip out of the eye. On the other end of the floss, tie a large knot..... And thats it for set-up.
Now obviously you can take the fabric out of the hoops and frame it to hang on the wall, or you could sew a back on it, stuff it, and make it into a blanket. But, my kids wanted theirs hung on the wall hoop and all!
Theres nothing like having new handcrafted artwork to hang on my walls.
Labels:
activity,
home-made present,
learning,
sew
Tuesday, February 22, 2011
Newspaper Beads
Let me tell you the reasons I love this project:
1. It was something my son and I did together, and we both had fun. 2. It was a great way to recycle some old newspapers. 3. It makes a really cute gift for your little one to give to Grandma for Easter. And my favorite reason, 4. My heart melted when my son told me he wanted me to have it because it would look so pretty on my wrist. xoxoxo
The only bad part about this project: It takes a few days to complete it because you have lots of drying time.....
Mommy & Kid Part: Start of by taking a newspaper and tearing it into small pieces. You can also use the old sales ads that come in your paper. My pieces ended up being anywhere from quarter sized to candy bar sized. The smaller the better. Ya know, I'm amazed at how much kids love to tear up newspaper :)
Here is an adult part: Take your cut-up newspaper, and put it in a large pot. Boil some water and pour it over the newspaper. You'll want enough to cover the paper. Then, put the lid on the pot and leave it sitting for an hour or a little more. You'll want to stir it every now and then. The goal is to have the paper break up into a nice mush.
Once you get this beautiful mush, you want to drain out the water. You can do this using a collander if you want, however, I found it was easier to take handfuls, squeeze the water out, and then put it in another bowl. When the excess water is out, mix in some Elmer's glue to help hold the paper together. Just guess on the amount. I used about 8 pages of paper and maybe 1/4 bottle of Elmers. There is really no exact science to this part. Heres my warning: Your hands are going to be black when you are done!! Don't worry though, it washes off, but be careful not to get it on your clothes. I also suggest washing your pot as soon as you are finished because the inside will be covered in black also (don't worry, it washes out).
Alrighty, next is another Mommy & kid part: Its time to form the beads. Take out small amounts of your mush and roll it into balls. Try to squeeze out any extra water as you go. My son didn't get the "squeeze the water out" concept, and his turned out fine, so don't worry about it too much. I will say, shaping the balls is a little harder than I expected. You can't really roll it out because it breaks apart a little. It just takes lots of squeezing and hand-shaping. Have fun with it!! Make some squares, balls, flat round discs... whatever your little hearts desire.
Here is the rough part: Once you get your beads all shaped, put them on a piece of aluminum foil or wax paper and wait for them to dry. Its gonna take two to three days for them to dry out completely. I hate waiting, but ya gotta do it. When they have completely dried out, it will be pretty obvious cause they will be super light.
Now that the beads are dry, drill a hole thru each bead. Then you can either paint them as they are, or you can sand them down a little with sandpaper or an emory board. The will not be pefectly smooth; they actually have a natural rock kinda look. They would probably look pretty cool painted to look like turquoise or something. But my kids just went crazy painting all different colors :) Hint: You may want to put wire thru the beads before you paint them or you may paint the holes shut. Not a big deal, just makes it a little harder to find the holes when you string them. After the paint has dried, spray them with a gloss finish, string them, add a hook, and wear them!!
Labels:
activity,
home-made present
Wednesday, February 9, 2011
Because I Had to Use the Leftover Paint Swatch Pieces.....
After we made the Paint Swatch Monster Valentines, we had a bunch of little pieces of paper paint swatches left (these were the little pieces that we cut off after the cards were glued together that contained the names of the paint colors). My son looked at them and said, "Now what are we going to make with these?" I'm thinking he's been around me too long. He kept arranging the tiny pieces next to each other, making pictures, and I realized that they looked like little mosaic pieces. I dug thru the closet where I keep all the just-in-case-I-need-it stuff and found a clay flower pot!Sooooooo..... Here is what we did! I poured a bowl of decoupage glue, gave my son a paint brush, and let him glue the pieces to the pot. I showed him how to take the smaller pieces and fill in the empty spots, and he did awesome! After he was finished, we painted a coat of decoupage sealer over the entire pot to waterproof it and give it a glossy finish....... LOVE IT!
Labels:
activity,
home-made present,
repurpose
Paint Swatch Valentine Card Monsters....
Happy Valentine's Day!! Today we made Valentine's for my son's preschool class, and I have to say, I think they turned out super cute. I wanted bright, fun cards, and I think we accomplished that.
For the card, I gathered up a bunch of paper paint swatches that I had been collecting each time we repaint a room (because of coarse I didn't throw them away when I was done). I took two cards and glued them together, pretty sides out. I started using hot glue, but found that spray adhesive worked better. It gave a smoother finish. And since it drys slower than hot glue, it gave me a chance to move the cards around until the were lined up correctly.
After they dried, I put them on the cutting board and cut off the part of the card that told what color the swatch was. That left me with a double-sided color card with nothing on either side. I then took my permanent marker and wrote Valentine greetings on one side, signed my sons name, and left the other side for monster-making.
So, next I gathered up some sticky-backed googly eyes and stickers. For the mouth, I found some sticky-backed red craft foam and cut mouths of all shapes and sizes. I put all the different supplies in piles on the table and let my son go crazy decorating the cards. He got soo into making these monsters!
Once he was finished, we cut some yarn and glued it to the monster heads. And of coarse, we made some with mustaches. To attach the yarn, I used a decoupage glue so that my son could put the yarn on without burning himself.
And there ya go!!
Labels:
activity,
home-made present,
repurpose,
valentines day
Tuesday, June 22, 2010
Fathers Day Stepping Stones
I tried to dream up something new and exciting for the kids to make for a Father's Day present this year, but I've been so busy that I just came up with nothing. So, I decided to do a craft that I've done before, pre-children. We made concrete stepping stones that daddy could put in the garden.
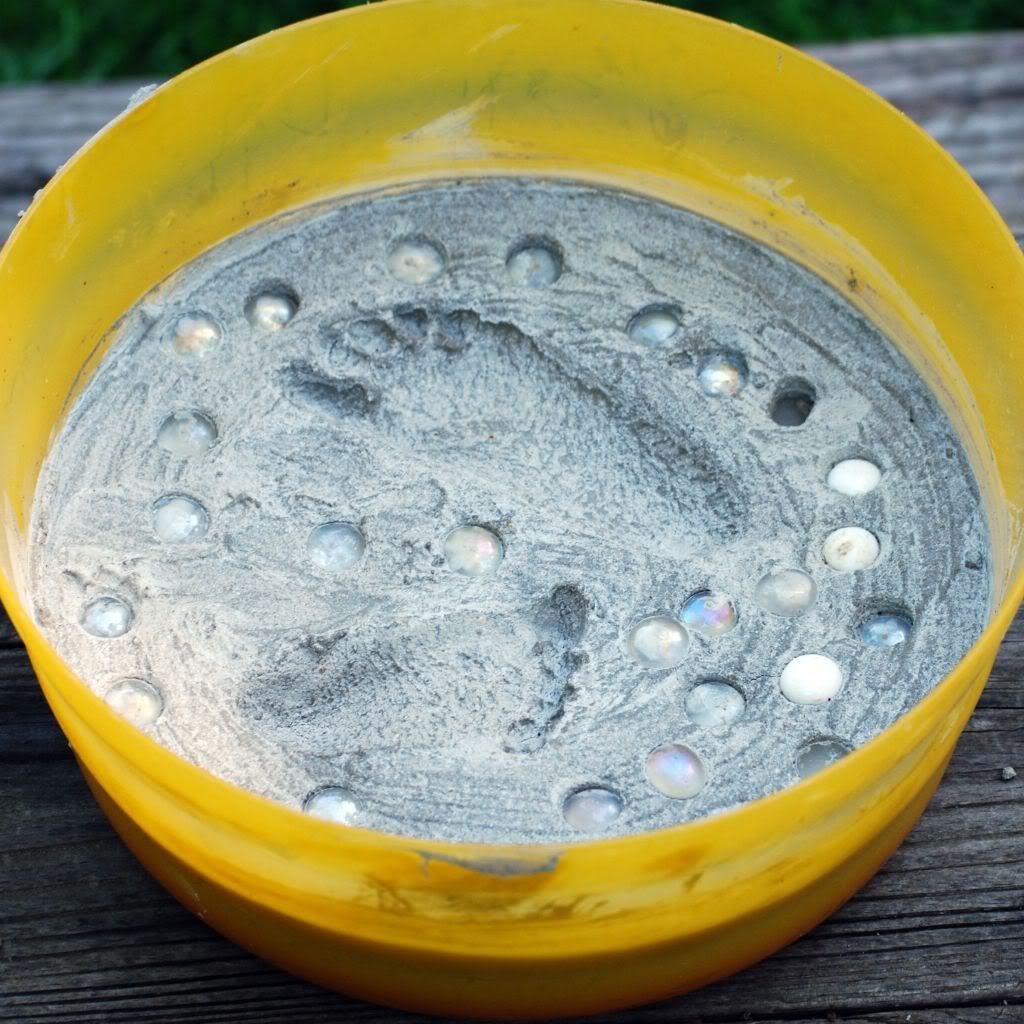
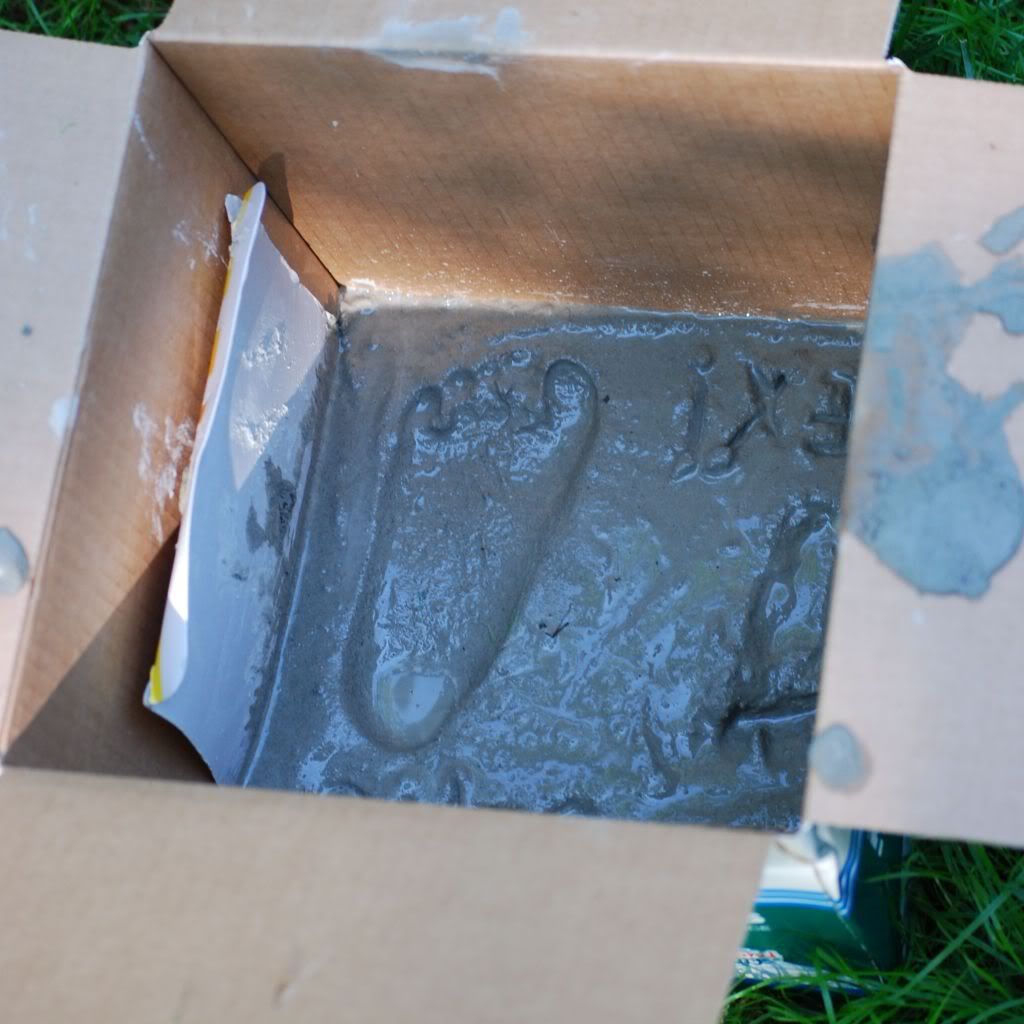
I went searching in the shed for the mold that I used before, but I couldn't find it. I didn't want to buy a new mold, so I improvised. For one stone, I used an old plastic bowl that I didn't use anymore (cause I left it outside after a cookout and never got around to taking it in). If you actually put your stuff away and don't have any old ones laying around, just go to the dollar store and get one. Its much cheaper than buying the "stepping stone mold" from the craft store. For the other stone, I used a cardboard box. .
Instead of buying the bag of stepping stone mix, I used some left-over concrete/mortar. You can actually buy a bag at your local home improvement store for about $6. This is a huge advantage over the kit at the craft store. The craft store bag makes one 12 inch stone or two 8 inch stones. The mortar from the home improvement store will make billions of stones (ok, not billions, but A LOT).
Mix up some concrete and water to a brownie consistency. Then, pour it into your molds and smooth it out. Let it set for a couple of minutes, then let your kids decorate. I decided to do my kids footprints. In one, we used stones that I had left over out of an old vase of flowers. I don't have a picture of it, but for one I used stones left over out of an old fishtank. You could also use rocks from the yard, left-over nuts and washers, cut-up straws, just whatever you find laying around.
Another option, we had a bag of sand left-over from the sandbox, so I cut the top open and had the kids step in it. When they picked up their feet, their foot-print was left behind. So, I filled the footprint with mortar, let it hardened, and pulled the hardened form out. It made a foot-shaped stone.
Let your stone set-up about two days and there you have it! Between pouring in the ingredients, mixing it up, pouring into molds, adding embellishments, and stepping into wet concrete, my son loved this project!
I went searching in the shed for the mold that I used before, but I couldn't find it. I didn't want to buy a new mold, so I improvised. For one stone, I used an old plastic bowl that I didn't use anymore (cause I left it outside after a cookout and never got around to taking it in). If you actually put your stuff away and don't have any old ones laying around, just go to the dollar store and get one. Its much cheaper than buying the "stepping stone mold" from the craft store. For the other stone, I used a cardboard box. .
Mix up some concrete and water to a brownie consistency. Then, pour it into your molds and smooth it out. Let it set for a couple of minutes, then let your kids decorate. I decided to do my kids footprints. In one, we used stones that I had left over out of an old vase of flowers. I don't have a picture of it, but for one I used stones left over out of an old fishtank. You could also use rocks from the yard, left-over nuts and washers, cut-up straws, just whatever you find laying around.
Another option, we had a bag of sand left-over from the sandbox, so I cut the top open and had the kids step in it. When they picked up their feet, their foot-print was left behind. So, I filled the footprint with mortar, let it hardened, and pulled the hardened form out. It made a foot-shaped stone.
Let your stone set-up about two days and there you have it! Between pouring in the ingredients, mixing it up, pouring into molds, adding embellishments, and stepping into wet concrete, my son loved this project!
Labels:
activity,
home-made present
Thursday, June 3, 2010
Easiest Teether Ever
I was blog-surfing earlier today and saw the cutest little teething ring ever! Its a wooden ring with pretty fabric and ribbons attatched around it. I knew this was something that my little one would love to play with; she loves ribbons and tags, and the wooden ring just looks like it would feel good on her little gums.
Well, I happened to have a bunch of wooden rings in my craft closet (I think there is a little bit of everything in there), so I decided to make one. Because I already have too many projects going on right now, I decided to simplified mine a little (if you want to see the much cuter inspiration, check them out over at Patchy Apple).
So anyway, here is what I ended up with.
Well, I happened to have a bunch of wooden rings in my craft closet (I think there is a little bit of everything in there), so I decided to make one. Because I already have too many projects going on right now, I decided to simplified mine a little (if you want to see the much cuter inspiration, check them out over at Patchy Apple).
So anyway, here is what I ended up with.
Basically, I took an unfinished wooden ring and tied little pieces of ribbon all the way around it. (You were right, Abbie. There was a use for all those little pieces of ribbon left over from making hairbows). I tied the knots as tight as I could get them, then I grabbed a needle and thread and stitched them so that they would stay put.
AND THATS IT!! Told you I did it the simple way.
Now I know this isn't the prettiest thing in the world, however, my daughter is in LOVE with it!! She wouldn't put it down.
I think I may make a couple of extras and keep them in the car and diaper bag.
Labels:
home-made present
Wednesday, June 2, 2010
Hello Mr. Sewing Machine
After monthes of closet time, I finally pulled my sewing machine from the closet and got it all set up. Its been away partly because I hate dragging it out, setting it it up, and having to keep the kids off of it, then putting it right away (since I have no sewing room, I use my kitchen table) and partly because I lost the cord for awhile.
I've made the most of this time together with my machine and have kept myself sewing most of my spare minutes the last few days. Spare minutes with these two rugrats are few and far between, but I've managed to get some time in.
I have a babyshower to go to this weekend, and I wanted to make a few gifts for the soon-to-be-born little boy. I went with the kids to the fabric store and let Russ pick all the fabric. I think my 3 year old has a knack for this because I love all his choices.
So, I figured I would share a little of what I've been working on.
I made a few other things that need a little finishing up. I made a couple of things for me, a few for my kids, and a few because I don't know why. Hopefully, I might get some more pictures up soon.
I've made the most of this time together with my machine and have kept myself sewing most of my spare minutes the last few days. Spare minutes with these two rugrats are few and far between, but I've managed to get some time in.
I have a babyshower to go to this weekend, and I wanted to make a few gifts for the soon-to-be-born little boy. I went with the kids to the fabric store and let Russ pick all the fabric. I think my 3 year old has a knack for this because I love all his choices.
So, I figured I would share a little of what I've been working on.
Here is the first set I made. Russ picked out the animal print and I picked the material for the back.
And of coarse Russ had to get some John Deere material.
I thought this one would be cute for the 4th of July (even thought the baby won't be born until August. He can wear it next year).
And of coarse I had to make something for Lexi!!
I made a few other things that need a little finishing up. I made a couple of things for me, a few for my kids, and a few because I don't know why. Hopefully, I might get some more pictures up soon.
Labels:
clothing,
home-made present,
Random Thoughts
Monday, May 3, 2010
The Cozy Cone
My son is soooo into the Disney Cars movie; I think we watch it at least 4 times every week. Whenever we go out, we keep our eyes out for anything from the movie that he doesn't have yet. So, today I was at Target looking through the dollar section, and I got excited when I saw a 6 pack of orange cones. I immediately thought COZY CONE MOTEL.
I bought the 6 pack of cones and went home and got to work. Ok, I didn't do too much work, it was pretty simple. But when Russ woke up and saw what I did, he was literally screaming with excitement!
I took the cones and cut an opening in the front measuring approximately an inch and half by an inch and half. On some of them, I cut across the top of the opening so that there was a square door hole. On others, I just cut up the two sides and then folded the flap up to form a porch. Be sure to cut slowely and carefully or the plastic will crack (thats why there are 4 Cozy Cones instead of the 6 that came in the pack).
After that, I just took a permanent marker and drew on some room numbers and windows.
And there you have it, the COZY CONE MOTEL!!
I bought the 6 pack of cones and went home and got to work. Ok, I didn't do too much work, it was pretty simple. But when Russ woke up and saw what I did, he was literally screaming with excitement!
I took the cones and cut an opening in the front measuring approximately an inch and half by an inch and half. On some of them, I cut across the top of the opening so that there was a square door hole. On others, I just cut up the two sides and then folded the flap up to form a porch. Be sure to cut slowely and carefully or the plastic will crack (thats why there are 4 Cozy Cones instead of the 6 that came in the pack).
After that, I just took a permanent marker and drew on some room numbers and windows.
And there you have it, the COZY CONE MOTEL!!
Labels:
activity,
home-made present,
repurpose
Thursday, April 22, 2010
Happy Earth Day
I was at my dad's last week, and he had the cutest little simple tool I'd ever seen. You use it to turn strips of newspaper into little pots for starting seeds. They are great little pots because once the seeds sprout, you can plant the entire newspaper pot into the ground.
I wanted to make this little tool for myself, but that would require using the lathe, and well, I need all my fingers. I came home and sat down next to the recycling bin and figured out how I could make the pots using stuff we had thrown out. I finally got it to work and so, to celebrate Earth Day, we decided to make some of these newspaper pots and planted some wildflower seeds in them.
The only "tools" I used were a water bottle that we cut both ends off of and a laundry detergent cap.
To start, take your newspaper (after you've finished reading it) and cut strips all the way across that are about 6 inches tall and are the length of the paper.
Take one strip and wrap it around the water bottle. Let about 2 to 3 inches of the paper hang over the end of the bottle (the overhang will form the bottom of the pot). The overhang should be over the cut end of the bottle. You keep wrapping around and around until you reach the end of the paper.
Once the newspaper is around the bottle, push the overhanging paper up inside the cut-out hole in the bottle. I used the laundry detergent lid to get it pushed all the way up in there.
Next, carefully pull the newspaper off the bottle. Reach inside and twist the paper that was pushed inside. It helps if you set the pot on the table while twisting the inside paper. This will form a nice, solid bottom.
Now you can fill you pot with dirt and plant your seeds. I placed all my pots in a tray that we got when we bought flowers. If you don't have one, you can put them on a cookie sheet. Put the tray in a nice sunny area, water daily, and when they sprout, you can plant the entire newspaper pot and all straight into the ground!
Happy Earth Day!
Labels:
activity,
Earth Day,
family fun,
home-made present,
repurpose
Tuesday, April 20, 2010
Crayon Iron-Ons
I know, I've already done crayons (probably will do them again). But, they have soo many fun uses that I can't get enough. This time we used our crayons and some sandpaper to make iron-ons. The little ones (and big ones) will love creating their own clothing or accessory designs! Its such a fun project for kids of all ages.
Take a piece of coarse sandpaper and color your design on the rough side. I free-handed some hearts and flowers. Since my son isn't old enough to really draw designs yet, I cut out some shapes and letters for him to color. Remember: When cutting out letters or when coloring words, you must make them backwards so when they are transfered, they face the right way.
Now for the adult portion! Take your material (shirt, bag, whatever) and put it on your ironing board. Be sure to put a piece of white paper or aluminum foil under the layer of fabric you are putting your iron-on on. If you don't, the crayon will bleed through. Place your picture on the fabric, crayon side down. Now iron it on. Be sure to move the iron very slowly and iron for 10-20 seconds (don't burn your shirt though).
Now, carefully peel off the sandpaper while its still hot and ALL done!!
BE SURE TO READ THIS: While handwashing is best, you can wash your project in the machine on cold. DO NOT DRY YOUR PROJECT IN THE DRYER! Not only will the crayon melt all over your project, it will probably ruin all the clothes in the dryer. I know this from experiences with crayons left in pockets.
Take a piece of coarse sandpaper and color your design on the rough side. I free-handed some hearts and flowers. Since my son isn't old enough to really draw designs yet, I cut out some shapes and letters for him to color. Remember: When cutting out letters or when coloring words, you must make them backwards so when they are transfered, they face the right way.
Now for the adult portion! Take your material (shirt, bag, whatever) and put it on your ironing board. Be sure to put a piece of white paper or aluminum foil under the layer of fabric you are putting your iron-on on. If you don't, the crayon will bleed through. Place your picture on the fabric, crayon side down. Now iron it on. Be sure to move the iron very slowly and iron for 10-20 seconds (don't burn your shirt though).
Wait until your child sees their masterpiece on a piece of clothing. They'll love it!
BE SURE TO READ THIS: While handwashing is best, you can wash your project in the machine on cold. DO NOT DRY YOUR PROJECT IN THE DRYER! Not only will the crayon melt all over your project, it will probably ruin all the clothes in the dryer. I know this from experiences with crayons left in pockets.
Labels:
activity,
clothing,
family fun,
home-made present,
repurpose
Saturday, April 3, 2010
Bunnies and Chics and All that Cute Stuff
When I decided to make some fun little stuff for the kid's Easter baskets, this is the first thing that popped into my mind. By no means am I trying to say I invented these little boogers (I actually had a purple one when I was little). So, I got my washrags and folded them up until they looked like I remember, and now I'll show you what I did.
For the bunny: Fold the washrag into a triangle and roll it up, starting with the pointy side.
Next you want to fold the rag around to form an O.
While holding the rag as shown above, fold the two ends back over your hand. It will form a "head" on front of the O.
Now take a piece of ribbon and tie it around the entire area to hold the head in place (tie it around the rag where my fingers are in the last pictures).
For the chic: Start off the same as the bunny.
Now, instead of flipping the ends up, you flip them to the sides to form wings.
As you see above, I pulled one side of the rag down and to the side to have a smoother area for the face. Now wrap a piece of ribbon around the entire thing (where my fingers are).
Now, to make the faces, I just glued on some pom-poms and googly eyes. Because my 7 month old eats everything she can get her hands on, I decided it would be safer to paint a face on her bunny.
These guys are a great idea if you are looking for a last minute basket stuffer since they are quick and easy to make!
Labels:
activity,
home-made present,
repurpose
Subscribe to:
Posts (Atom)