Tuesday, June 22, 2010

Fathers Day Stepping Stones

I tried to dream up something new and exciting for the kids to make for a Father's Day present this year, but I've been so busy that I just came up with nothing. So, I decided to do a craft that I've done before, pre-children. We made concrete stepping stones that daddy could put in the garden.

I went searching in the shed for the mold that I used before, but I couldn't find it.  I didn't want to buy a new mold, so I improvised.  For one stone, I used an old plastic bowl that I didn't use anymore (cause I left it outside after a cookout and never got around to taking it in).  If you actually put your stuff away and don't have any old ones laying around, just go to the dollar store and get one.  Its much cheaper than buying the "stepping stone mold" from the craft store.  For the other stone, I used a cardboard box.  .

Wall

Grateful
Instead of buying the bag of stepping stone mix, I used some left-over concrete/mortar.  You can actually buy a bag at your local home improvement store for about $6.  This is a huge advantage over the kit at the craft store.  The craft store bag makes one 12 inch stone or two 8 inch stones.  The mortar from the home improvement store will make billions of stones (ok, not billions, but A LOT). 

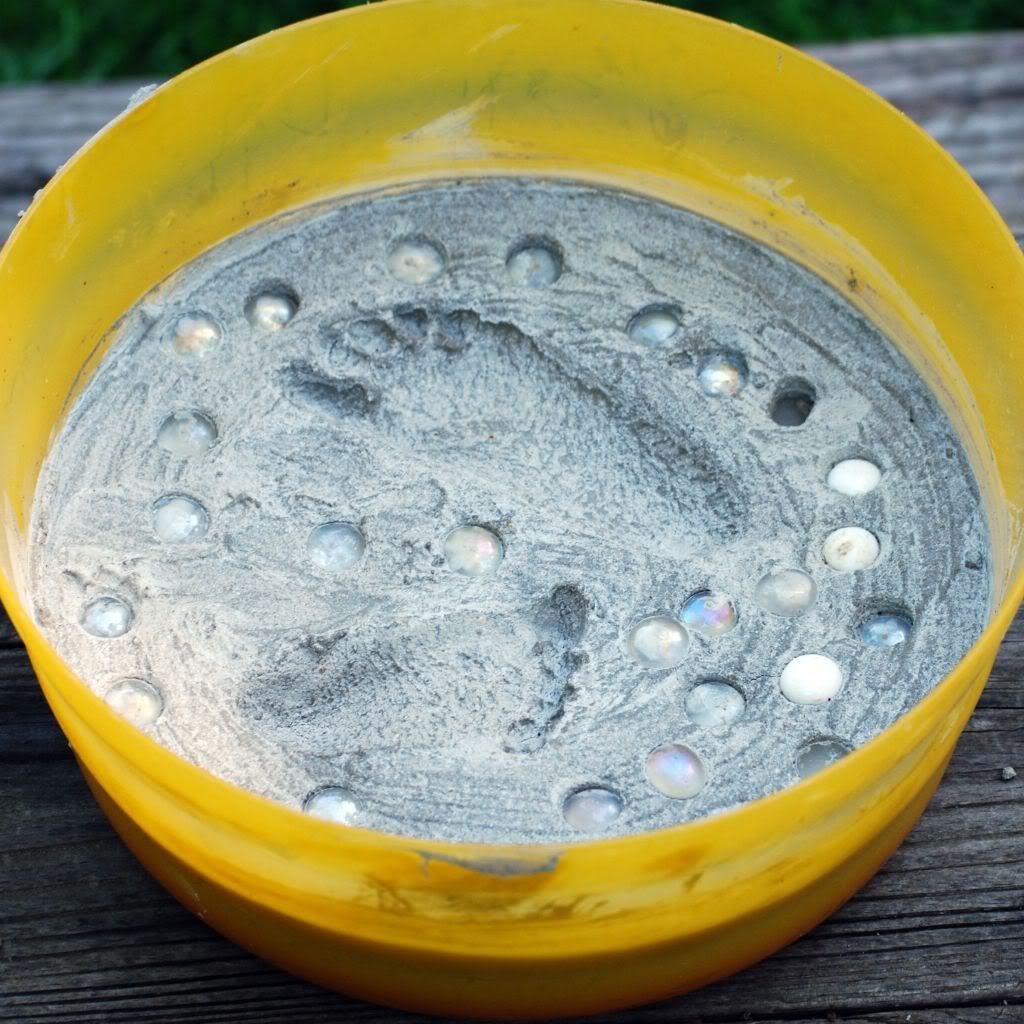
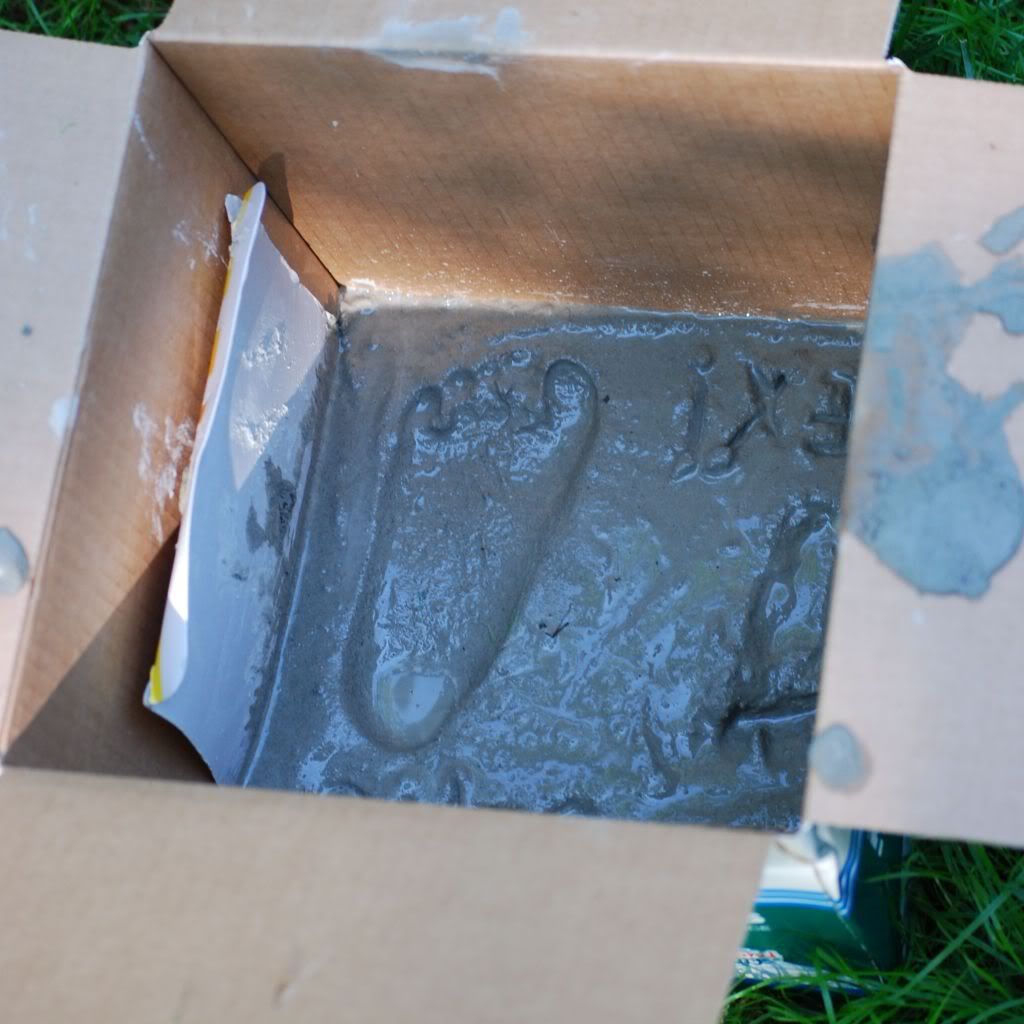
Mix up some concrete and water to a brownie consistency.  Then, pour it into your molds and smooth it out.  Let it set for a couple of minutes, then let your kids decorate.  I decided to do my kids footprints.  In one, we used stones that I had left over out of an old vase of flowers.  I don't have a picture of it, but for one I used stones left over out of an old fishtank.  You could also use rocks from the yard, left-over nuts and washers, cut-up straws, just whatever you find laying around.
Another option, we had a bag of sand left-over from the sandbox, so I cut the top open and had the kids step in it.  When they picked up their feet, their foot-print was left behind. So, I filled the footprint with mortar, let it hardened, and pulled the hardened form out.  It made a foot-shaped stone.

Let your stone set-up about two days and there you have it!  Between pouring in the ingredients, mixing it up, pouring into molds, adding embellishments, and stepping into wet concrete, my son loved this project!

Friday, June 18, 2010

Alexa in Wonderland - Little Bit of Ranting

As some of you know, my 10 month old pulled an Alice and tried to take a trip to Wonderland yesterday.  We were hanging out in my yard, which is on a mountain in the woods, and she was just crawling around as always.  I was in the middle of the yard helping my son with something and in the 2 minutes I looked away, she made her way to the edge of the trees and had eaten a wild mushroom or two and was about to eat another.  So, I scooped her up, ran in and called poison control, and rushed her to the ER.  After 6  hours of observation, we were released to go home.  We got lucky, and she was perfectly fine.  Other than the thrill of trying to entertain a 10 month old in a small hospital bed for 6 hours, the the hospital stay was uneventful.

Now for the reason I feel I need to share this; I was treated by multiple people like I was a bad mom!!  Really, am I the first person who has turned their head and had their kid get into something they shouldn't have??  I mean, I could have her in the middle of an empty padded room and she would find a way to hurt herself.  If she was in a warehouse filled with cotton candy and chocolate chips, she would find an exposed piece of floor tile and eat it.  The doctor asked me what happened, so I said that I looked away and before I knew it she was across the yard eating something.  The doctor actually said to me, "So, where you hanging out talking to friends and just not paying attention?"  OH MY!!  ARE YOU SERIOUS!  Where the heck did that come from.  Then I was asked what time it happened and I told them 11:20.  Poison control basically called me a liar and rudely told the doctor there was no way it happened at 11:20 because I called them at 11:15.  So, I was 5 minutes off and that means I'm trying to hide something???  So, next time your child cuts a finger, don't pick them up and stop the bleeding.  Run in the house and document the event complete with the exact time while they bleed profusely, then go stop the bleeding (Ok, maybe I'm being dramatic there, but thats how they made me feel).  And on top of these people (not the word I was looking for, but it works), I had non-employees (and thats what I'll call them) tell me that I need to watch my children better.....  Shaking my head....

My children gnawl on bugs, dog food, paper, the furniture, my leg, and anything else they can get in their mouth.  So, all you super-moms out there who never take your eyes off your children and whose children have never gotten hurt or eaten something they shouldn't have, would you please give me lessons??  Ok, I'm over it now!! :)

Sunday, June 6, 2010

From Christmas Tin to Travel Bin

I was cleaning out a cabinet the other day, and I found this tin that someone gave me full of cookies at Christmas.  Well, you know I can't just throw something like this away, so I put it on the counter and decided to use it to hold all kinds of fun stuff for Russ to use while we are in the car. 

I decided that I would paint it (so it didn't look so Christmas-y), and immediately I thought of the left-over chalkboard paint hiding in the back of the closet.  So, I took some sandpaper and buffed it to make the paint stick better, and then I grabbed the chalkboard paint and  painted the lid while Russ used craft paint on the rest of it (I can't paint without him).  I used the chalkboard paint on the inside and the outside of the lid. 
 
After the lid was painted, I thought it looked like a road, so I painted some yellow lines on it.  Then, I went digging through Russ' room and found a few little plastic cars we won in the arcade.  I took a strip of magnet, cut small pieces, and stuck them to the bottom of the cars.  Now, I had a racetrack with cars that would stick to the tin so they wouldn't fall off and get lost.
The only thing left to do was fill the little travel kit with fun stuff (including chalk, fruit snacks, pad and paper, etc.) and put it in our car.
I'm really happy with what we ended up with, and my son has really enjoyed having something new to play with in the car!!
(Wanted to say he doesn't have his seatbelt on because this was a staged pic in my driveway.  Notice the open door.  hehe)

Thursday, June 3, 2010

Easiest Teether Ever

I was blog-surfing earlier today and saw the cutest little teething ring ever!  Its a wooden ring with pretty fabric and ribbons attatched around it.  I knew this was something that my little one would love to play with; she loves ribbons and tags, and the wooden ring just looks like it would feel good on her little gums. 

Well, I happened to have a bunch of wooden rings in my craft closet (I think there is a little bit of everything in there), so I decided to make one.  Because I already have too many projects going on right now, I decided to simplified mine a little (if you want to see the much cuter inspiration, check them out over at Patchy Apple).

So anyway, here is what I ended up with.
Basically, I took an unfinished wooden ring and tied little pieces of ribbon all the way around it. (You were right, Abbie.  There was a use for all those little pieces of ribbon left over from making hairbows).  I tied the knots as tight as I could get them, then I grabbed a needle and thread and stitched them so that they would stay put.

AND THATS IT!!  Told you I did it the simple way.

Now I know this isn't the prettiest thing in the world, however, my daughter is in LOVE with it!! She wouldn't put it down.

  I think I may make a couple of extras and keep them in the car and diaper bag.

Wednesday, June 2, 2010

Hello Mr. Sewing Machine

After monthes of closet time, I finally pulled my sewing machine from the closet and got it all set up.  Its been away partly because I hate dragging it out, setting it it up, and having to keep the kids off of it, then putting it right away (since I have no sewing room, I use my kitchen table) and partly because I lost the cord for awhile. 

I've made the most of this time together with my machine and have kept myself sewing most of my spare minutes the last few days.  Spare minutes with these two rugrats are few and far between, but I've managed to get some time in. 

I have a babyshower to go to this weekend, and I wanted to make a few gifts for the soon-to-be-born little boy.  I went with the kids to the fabric store and let Russ pick all the fabric.  I think my 3 year old has a knack for this because I love all his choices.

So, I figured I would share a little of what I've been working on.

Here is the first set I made.  Russ picked out the animal print and I picked the material for the back.
And of coarse Russ had to get some John Deere material.
I thought this one would be cute for the 4th of July (even thought the baby won't be born until August.  He can wear it next year).
And of coarse I had to make something for Lexi!!

I made a few other things that need a little finishing up.  I made a couple of things for me, a few for my kids, and a few because I don't know why.  Hopefully, I might get some more pictures up soon.

Sunday, May 30, 2010

Back from Vacation

I'm back!!  I had a week of two sick babies, a sinus infection for myself, but then it was all better because we went on VACATION!!
We spent a week in Ocean City having lots of family fun.  We did the beach, hit the carshow, saw the wild ponies,
walked the boardwalk, had my favorite ice cream, 

did some crabbing
and had lots of family fun-time!!
We had a great time!  I had soooo many fun ideas pop in my head over the past few weeks that Russ and I will have lots of stuff to keep us busy.  Can't wait to post!!


Monday, May 3, 2010

The Cozy Cone

My son is soooo into the Disney Cars movie;  I think we watch it at least 4 times every week.  Whenever we go out, we keep our eyes out for anything from the movie that he doesn't have yet.  So, today I was at Target looking through the dollar section, and I got excited when I saw a 6 pack of orange cones.  I immediately thought COZY CONE MOTEL. 
I bought the 6 pack of cones and went home and got to work.  Ok, I didn't do too much work, it was pretty simple.  But when Russ woke up and saw what I did, he was literally screaming with excitement!

I took the cones and cut an opening in the front measuring approximately an inch and half by an inch and half.  On some of them, I cut across the top of the opening so that there was a square door hole.  On others, I just cut up the two sides and then folded the flap up to form a porch.  Be sure to cut slowely and carefully or the plastic will crack (thats why there are 4 Cozy Cones instead of the 6 that came in the pack).

After that, I just took a permanent marker and drew on some room numbers and windows.

And there you have it, the COZY CONE MOTEL!!

Tuesday, April 27, 2010

An Eggcellent Snake Project

I finally got tired of seeing the basket of plastic Easter eggs sitting in the living room floor and decided we needed to do something with them or throw them away.  I was looking at them (thinking about tossing them in the trash) and noticed that each half of each egg had holes in the ends.  I assume these holes are there in case one gets stuck in your childs mouth.  So anyway, I grabbed some line and gave it to Russ to string the eggs onto. 

I was amazed at how much thought he put into stringing them together and how carefully he worked.  I wanted to help, but he enjoyed it too much and wouldn't let me!  So, as he was stringing the eggs, they started looking like a long, winding snake.  Our playtime had developed a into a snake project. 

Russ continued stringing the eggs until he had one left.  The very last egg was turned backwards to give it a "finished" look and the line was tied in a knot.

Then, since we decided it was a snake, I painted a face on it and glued on a piece of ribbon to make a mouth.  Our pointless project turned into a cute little toy.  My 8 month old daughter especially likes playing with it!!  And best of all, I didn't have to throw the eggs away.


Thursday, April 22, 2010

Happy Earth Day

I was at my dad's last week, and he had the cutest little simple tool I'd ever seen.  You use it to turn strips of newspaper into little pots for starting seeds.  They are great little pots because once the seeds sprout, you can plant the entire newspaper pot into the ground.  

I wanted to make this little tool for myself, but that would require using the lathe, and well, I need all my fingers.  I came home and sat down next to the recycling bin and figured out how I could make the pots using stuff we had thrown out.  I finally got it to work and so, to celebrate Earth Day, we decided to make some of these newspaper pots and planted some wildflower seeds in them.

The only "tools" I used were a water bottle that we cut both ends off of and a laundry detergent cap.

To start, take your newspaper (after you've finished reading it) and cut strips all the way across that are about 6 inches tall and are the length of the paper.  

Take one strip and wrap it around the water bottle.  Let about 2 to 3 inches of the paper hang over the end of the bottle (the overhang will form the bottom of the pot).  The overhang should be over the cut end of the bottle.  You keep wrapping around and around until you reach the end of the paper.

Once the newspaper is around the bottle, push the overhanging paper up inside the cut-out hole in the bottle.  I used the laundry detergent lid to get it pushed all the way up in there.

Next, carefully pull the newspaper off the bottle.  Reach inside and twist the paper that was pushed inside.  It helps if you set the pot on the table while twisting the inside paper.  This will form a nice, solid bottom.

Now you can fill you pot with dirt and plant your seeds.  I placed all my pots in a tray that we got when we bought flowers.  If you don't have one, you can put them on a cookie sheet.  Put the tray in a nice sunny area, water daily, and when they sprout, you can plant the entire newspaper pot and all straight into the ground!
Happy Earth Day!


Tuesday, April 20, 2010

Crayon Iron-Ons

I know, I've already done crayons (probably will do them again).  But, they have soo many fun uses that I can't get enough.  This time we used our crayons and some sandpaper to make iron-ons.  The little ones (and big ones) will love creating their own clothing or accessory designs!  Its such a fun project for kids of all ages.

Take a piece of coarse sandpaper and color your design on the rough side.  I free-handed some hearts and flowers.  Since my son isn't old enough to really draw designs yet, I cut out some shapes and letters for him to color.  Remember:  When cutting out letters or when coloring words, you must make them backwards so when they are transfered, they face the right way.


Now for the adult portion!  Take your material (shirt, bag, whatever) and put it on your ironing board.  Be sure to put a piece of white paper or aluminum foil under the layer of fabric you are putting your iron-on on.  If you don't, the crayon will bleed through.  Place your picture on the fabric, crayon side down.  Now iron it on.  Be sure to move the iron very slowly and iron for 10-20 seconds (don't burn your shirt though). 


Now, carefully peel off the sandpaper while its still hot and ALL done!!


Wait until your child sees their masterpiece on a piece of clothing.  They'll love it!

BE SURE TO READ THIS:  While handwashing is best, you can wash your project in the machine on cold.  DO NOT DRY YOUR PROJECT IN THE DRYER!  Not only will the crayon melt all over your project, it will probably ruin all the clothes in the dryer.  I know this from experiences with crayons left in pockets.

Saturday, April 3, 2010

Bunnies and Chics and All that Cute Stuff


When I decided to make some fun little stuff for the kid's Easter baskets, this is the first thing that popped into my mind.  By no means am I trying to say I invented these little boogers (I actually had a purple one when I was little).  So, I got my washrags and folded them up until they looked like I remember, and now I'll show you what I did.


For the bunny:  Fold the washrag into a triangle and roll it up, starting with the pointy side.

Next you want to fold the rag around to form an O.
While holding the rag as shown above, fold the two ends back over your hand.  It will form a "head" on front of the O.

Now take a piece of ribbon and tie it around the entire area to hold the head in place (tie it around the rag where my fingers are in the last pictures).


For the chic:  Start off the same as the bunny.


Now, instead of flipping the ends up, you flip them to the sides to form wings. 

As you see above, I pulled one side of the rag down and to the side to have a smoother area for the face.  Now wrap a piece of ribbon around the entire thing (where my fingers are).

Now, to make the faces, I just glued on some pom-poms and googly eyes. Because my 7 month old eats everything she can get her hands on, I decided it would be safer to paint a face on her bunny.


These guys are a great idea if you are looking for a last minute basket stuffer since they are quick and easy to make!

Thursday, April 1, 2010

Jar o' Beans

When deciding what to make for the kid's Easter baskets, I wanted to use things in the house so I didn't have to buy too much stuff.  Since I have plenty of baby food jars, I decided to turn them into jelly bean and robin egg holders.


First, paint your lid:  white for the bunny, yellow for the chic.

Take some felt (or construction paper) and cut your pieces.  For the bunny:  ears and feet.  For the chic:  beak, feet, and wings.


Now glue the pieces to the jars.  For the mouth and eyes, just grab a paintbrush and paint them on.  If you don't have a small paintbrush, use a toothpick.  Toothpicks work great for painting small things like eyeballs.

Only thing left to do is seperate out your yellow and white jelly beans or robin eggs and add them to their jars.


I couldn't let Russ help me with this one since it will be in his basket Easter morning, but I'm sure the kids would love to do this project with you.

Monday, March 29, 2010

I Love Contact Paper

This past weekend my playgroup and I had a booth at a local Children's Day where we had to provide a craft for all the kids in attendance.  We needed something that was easy for all age groups, not messy, and inexpensive.  So, we decided to make stained glass windows using tissue paper and contact paper.  This project is super simple for even the youngest kids.  The children seemed to all enjoy it so I'll share it with you.

Start out by ripping a whole bunch of little pieces of tissue paper.  They can be any size or shape, doesn't matter.  You can mix up the colors however you please.  I suggest that instead of buying it, you should pull out that stash of tissue paper you've collected at birthdays and Christmas.


Now, get out your contact paper.  For those who don't know about contact paper, its great!  Basically, its clear shelving paper that is sticky on one side and can be used for crafts, laminating, or lining shelves.  There are so many projects you can do with it (don't worry, I will be posting more).  You can find it with the shelving paper at your local grocery store.   So, back to the project:  cut a square about 5x5 out of the contact paper.

Peel the paper off the contact paper, and place it on the table sticky side up.  Have your child stick the pieces of tissue paper all over the contact paper.  The can overlap, there can be spaces uncovered, the whole sheet can be covered, it doesn't matter.

When they are finished, take another piece of 5x5 contact paper and peel the paper off.  Stick it on top of the first sheet of paper so that the tissue paper part is sandwiched in the middle. 

Now, grab some scissors and cut a shape into the contact paper sandwich.  I like eggs and hearts because they are simple.  If you want to do something more difficult and can't free-hand it, you can print a template online and use it as a guide.  We decided to do an Easter bunny since Easter is this weekend and my son has Easter bunnies on the brain.  You can do different shapes for each of the holidays.

To finish it off, cut a hole in your design and put a piece of ribbon through it to hang it from the window.
As I said, this project is so easy, but the kids will love it.  My photos don't do them justice, but they really do turn out cute.